You want clean fits, fewer leaks, and zero drama. This guide shows you how to tape tabbed briefs the smart way—angles that seal, refastening that actually works, and small habits that fix big headaches.
Why angles and refastening decide comfort, leaks, and skin
Bad angles equal channels that let fluid escape. Over-pulling breaks the “soft seal” at the waist or legs. Refastening wrong shreds the outer layer or kills tape grip. The fix is a repeatable technique plus the right closure system (adhesive vs hook-and-loop) and a good landing zone.
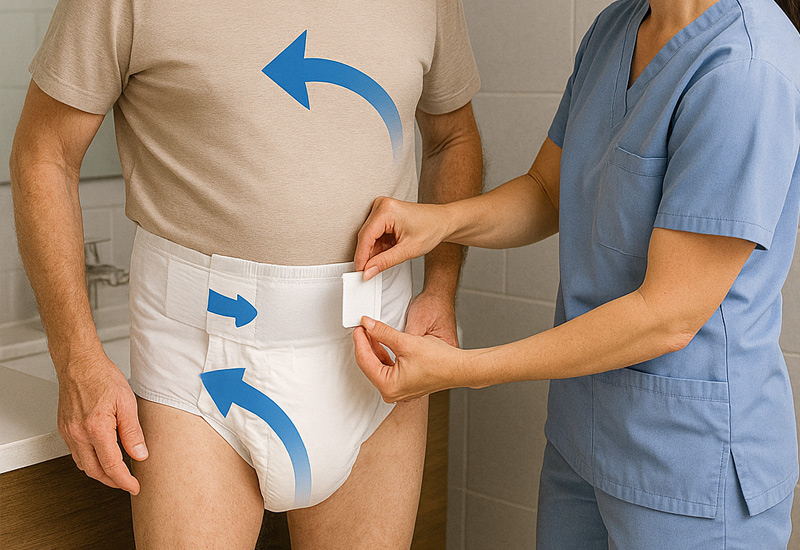
Top tabs angle slightly down to stabilize the waist.
Bottom tabs angle slightly up to hug the leg crease and keep cuffs upright.
Why it works: gravity tries to pull the brief down; top-down resists that creep, bottom-up closes the thigh gap.
Template B — “Top level, bottom inward” (extra leg seal)
Top tabs pull level with the waistband for a flat, even front.
Bottom tabs angle inward toward the absorbent core to cinch the thigh.
Why it works: creates a focused seal at the leg without over-tightening the waist.
Quick gut check: after taping, squat a bit, sit once, stand again. If the waist line still sits flat and the leg opening shows no daylight around the crease, you’re good.
Ref fasteners: adhesive vs hook-and-loop (and landing zone basics)
Refastening matters when you mis-align on the first try.
Adhesive tapes: high initial stick; they dislike body lotions, powders, and repeated lifts. Gentle first stick, then press to secure once alignment is right.
Hook-and-loop: multiple re-sticks, friendlier to quick micro-adjusts; best with a landing zone panel or “hook-anywhere” face material designed for repeated engagement.
In short: adhesive shines if you nail it first try. Hook-and-loop shines when you need to fine-tune. Both live their best life when the landing zone is clean and dry.
Standing vs lying: choose the flow that fits your scenario
Standing (or supported standing) gives great alignment for independent users. Lying is safer for some clinical settings and heavy caregiving. The goal stays the same: top stabilizes, bottom seals.
Standing flow: center the brief, set top tabs first (template A or B), then bottom tabs for leg seal.
Lying flow: roll, center, lift hips or use a gentle log-roll; still set top for stability, bottom for seal. Don’t chase symmetry in one go—lightly tack, check, then press.
The “don’t over-tighten” rule
Cranking down looks snug but backfires. Over-tight legs collapse the cuffs and create pressure ridges that channel fluid the wrong way. Aim for seal, not strangling. Skin should look smooth, not pinched.
Practical cheat sheet
What to do
Why it matters
How to do it right
When to tweak
Center first
Mis-centering ruins all angles
Fold lengthwise, place deep in the crease, smooth front
If front sits skewed after one step, re-center before pressing tapes
Top stabilizes
Stops slide and waist gapping
Template A: top down; Template B: top level
If front creeps down during steps, add a hair more top tension
Bottom seals legs
Stops side weep at thighs
Template A: bottom up; Template B: bottom inward
If cuffs look flat, re-lift cuffs, retape bottom a touch higher
Lift cuffs (leg guards)
Cuffs must stand to block lateral flow
Slide a finger around the thigh, pop the cuff up
If cuffs fold inward after sitting, re-shape gently
Light tack, then press
Saves your “redos”
Touch tapes lightly, check lines, then press to lock
If you’re new, always light-tack first—less waste
Keep landing zone clean
Better hold, fewer pop-offs
Dry front panel; avoid lotion overspray
If a tape edges up, clean/dry, then re-stick
Common field mistakes (and simple fixes)
Powder or cream on the front panel: adhesive hates it. Wipe the panel and hands; switch to hook-and-loop designs if mid-wear checks are common in your setting.
Chasing symmetry too early: lightly tack both sides, then refine. Full press is the last step.
Over-tight waist: creates a belly shelf that funnels fluid forward. Ease the top, re-angle bottom tabs for the seal you wanted in the first place.
Flat cuffs: if cuffs lie flat, they can’t guard. Pop them up with a fingertip sweep around each thigh after taping.
Sizing denial: if you’re between sizes, chasing perfect angles is a losing game. Correct size first; angles second.
Micro-case snapshots
Active daytime user, lots of sit-stand: Template A beats small creep. Top-down resists the inch-by-inch slip you see after multiple sit-stand cycles. Bottom-up keeps cuffs planted even when jeans rub.
Bedridden night care: Template B helps because lying shifts fluid sideways more; bottom-inward raises the leg dam without squeezing the waist too hard.
Care home with frequent toileting checks: hook-and-loop + clear landing zone wins; caregivers adjust fast without tearing the shell.
Post-meal bloating or position changes: light tack, walk two steps, then press. This tiny delay avoids mid-hour waist pop-offs.
Quick buyer lens: closures, panels, and private label choices
If you’re evaluating an Adult Diapers With Tabs factory or manufacturer for OEM/ODM, ask about:
Closure options: adhesive vs hook-and-loop, and whether the latter is true “hook-anywhere” or requires a landing zone.
Panel durability: does the front panel tolerate repeated light tacks without fuzzing or tearing?
Cuff resilience: cuffs should spring back after a sit or roll, not stay crushed.
Training materials: angle diagrams and fit SOPs reduce returns and staff training time.
Change-time efficiency: designs that allow quick micro-adjusts pay back in labor hours in busy facilities.
Lovinhug supports OEM/ODM discussions on closures, panels, and training assets so your private label doesn’t just look good on a shelf—it performs in the wild.
Angle templates, step-by-step
Fast Flow — Template A (Top-down / Bottom-up)
Fold the brief lengthwise; place deep into the crease.
Lift cuffs so they stand, not lie flat.
Light tack top tabs down to set the waist.
Light tack bottom tabs up to close the leg.
Sit once, stand, fingertip sweep around thighs, then press all tabs to lock.
Fast Flow — Template B (Top-level / Bottom-inward)
Center and smooth front panel.
Light tack top tabs level with the waistband.
Light tack bottom tabs inward toward the core.
Gentle squat test, then press to secure.
Last pass: trace the leg opening with one finger—feel for gaps.
Choosing your closure for your scenario
Scenario
Better fit
Why
What to watch
New user, self-fit
Hook-and-loop
More retries, less stress
Keep landing zone clean; don’t over-peel
Caregiver, frequent checks
Hook-and-loop + panel
Fast micro-adjusts
Teach “light tack, then press” to the team
Lotion/cream routine
Hook-and-loop
Less sensitive to residue
Still, wipe panel before re-stick
One-and-done fits
Adhesive
Strong initial bond
Aim your first placement; avoid powders on panel
Nighttime with position shifts
Either, but favor Template B
Inward bottom angles help leg seal
Re-shape cuffs after turning
Where Lovinhug helps
Angles solve half the problem; product architecture solves the rest. For example, a robust landing zone makes light-tack-then-press a breeze. Strong cuffs forgive a not-so-perfect bottom angle. If you’re testing sizes, try a range inside Adult Diapers With Tabs to find the size that lets angles work with you, not against you.
Relevant products you can compare as you practice angles:
3XL Adult Diapers with Tabs — for users needing extended sizing while keeping the same tab logic; good for standing fits and micro-adjusts mid-day.
XL Adult Diapers with Tabs — a common starting size in trials; practice light-tack routines here before bulk buys.
FAQ-style mini fixes
“Tape keeps popping.” Likely oily panel or over-tension. Clean panel, switch to light tack first, then press. Try hook-and-loop if checks are frequent.
“Leg leaks, even when tight.” Tight isn’t seal. Re-angle bottom tabs up/in, pop cuffs up, and stop crushing the thigh.
“Front drifts down after walking.” Top tabs too flat or too loose. Re-angle top slightly down, add a bit more pull.
“Shell fuzzing after two tries.” Wrong pairing of tape and panel, or pressing too hard on first try. Light tack, align, then press. Consider landing-zone designs.
“Size feels in-between.” Don’t fight the angles. Test the next size range. When the chassis is right, angles feel easy, not forced.
Final checklist you can teach in under a minute
Center deep, cuffs up.
Top for stability (down or level).
Bottom for seal (up or inward).
Light tack → test move → press.
Finger sweep the legs, quick sit-stand, done.
Drop your details and fill out the Lovinhug contact form—we’ll reply fast.